Thermoplastic Filament Storage Design
Stony Brook University
One of the first classes I took at Stony Brook was in Product Design & Optimization, and for the final project, I opted to design a filament storage unit for fused deposition modeling (FDM) 3D printing filament. Most thermoplastics used for this style of printing are hygroscopic to some degree, so if left in the open air, the plastic will absorb water from the environment. This results in weak prints with poor surface quality, and can damage the printer itself, so reducing water absorption is necessary. I wanted to design a relatively cheap, and entirely passive de-humidification unit, that would store the filament but also allow for direct printing. At the time, there weren't many options for storage that hit all these points, so it was a great fit for a final project.
Market Demand & Interest
First things first, the market demand for the actual product had to be looked at critically to assess whether or not the interest for it existed. When I was working on this, most solutions took a DIY approach, and utilized commercially available components (like storage bins and microwave ovens) to hold the filament, but these systems did not provide enough de-humidification to protect moisture sensitive filaments and most couldn't be printed from directly or were very bulky. Some commerical products had also appeared on Kickstarter, but were just too expensive for the average user to purchase. Based on this research, it was clear the interest was there, the solution just needed to be robust and affordable.


Product Criteria
With market research done, and a good idea of what customers did and did not want, I generated a list of criteria that the solution would have to meet or exceed for it to be considered acceptable. These criteria would be used to select the "best" solution concept after brainstorming as well as build specifications, and were defined as follows:
+ De-humidification process cannot impact material properties of filament
Each kind of filament, be it PLA or PEEK, has different temperature ranges it can be safely stored in. If it gets too hot, the filament can start warping and softening, making it unprintable and if it gets too cold, it brittles and can snap.
Using this knowledge, it was specified that that process temperature could not fall below 10°C, or exceed 55°C.
+ Minimize market cost for the end user
The cost was the single biggest complaint for most commercially available products, so keeping this down as much as possible was a really important criteria for the design. This impacts choice of material and production method most significantly, as something like an aluminum box would work great, but is expensive compared to a plastic. Based on feedback from the 3D printing/maker community, it seemed like $50 was a sweet spot, so this was set as the maximum price for the market cost.
The constraint on cost also has to take into consideration lifetime costs, like energy consumption and desiccant replacement, so an additional specification of re-usable desiccant was added to keep those costs down.
+ Properly sized to hold one spool of filament from various manufacturers
Depending on the manufacturer, filament spools come in various sizes, but pretty much all the same shape. For simplicity and cost considerations (bigger spools mean bigger containers, which mean more raw cost), I constrained it to 1 kg spools of filament.
After some research, and measuring my own stock of filament, I determined safe values would be a width of at least 91 mm, and a diameter of at least 210 mm. This would be able to accommodate spools from all major manufacturers that I could get specifications from, with a little room to spare.
+ Minimize transfer of moisture from the environment to the enclosure
A good de-humidification system isn't all that effective if the material of the enclosure allows excess moisture flow, so the chosen material has to provide a good seal against the environment.
After researching displays and museum enclosures, the allowable moisture vapor transmission rate (MVTR) was set at a maximum of 0.7 g/m2/day. This was a value that kept appearing, and is easily accomplished by injection molded plastics.
+ Minimize energy consumption for de-humidification
Energy use is one of the creeping cost factors here, so minimizing consumption was given heavy priority. A cheaper product upfront that consumes significant energy won't be any more beneficial to the end user than just buying new filament when it gets wet, especially in metro areas with high energy pricing.
To keep the cost reasonable, energy consumption for common household appliances was referenced and used to set a specification for the filament storage unit. The unit was required to consume less than 20 watts continuously or less than 50 watts intermittently, as this usage wouldn't have a significant impact on a user's energy bill.
+ Minimize humidity levels inside enclosure
Since the main purpose of the unit is to minimize water damage to the filament, making sure humidity levels inside the enclosure are low is paramount to the success of the unit. If the filament is still absorbing too much moisture while in the unit, it has failed as a product.
Digging through material properties and forums for quite some time yielded that filament water absorption is small when the relative humidity (RH) of the environment is below 30%, so 30% RH internally was set as the allowable maximum for the enclosure.
+ Able to print with filament directly from enclosure
Less hygroscopic thermoplastics, like ABS, often print fine for long periods of time in the open air. However others, like nylon, absorb moisture very quickly and can become damaged over the course of a single print, so being able to print with the filament still in the unit was key.
This is pretty easy to accommodate, with the only catch being the unit would need to be able to print with the two common filament sizes (3 mm and 1.75 mm), without the need for dedicated 1.75 mm and 3 mm units.
Concept Generation & Selection
Although it may seem counter intuitive, solutions were generated after the criteria and specifications for the product were set. Sometimes the criteria and specifications can be too limiting and prevent freely brainstorming, but without any limits, brainstorming may also yield no solutions that are feasible when evaluated.
With that in mind, I opted to focus on passive de-humidification methods as much as possible; electronics add cost, potential failure points, and require lifetime cost to run. It really just isn't necessary for this unit, as long as enough desiccant is present or the unit is sealed sufficiently, and it's best to keep things simple where possible. By referencing existing DIY solutions, pre-packaged food moisture control and museum enclosure de-humidification, I was able to generate a list of potential solutions. After evaluating all the solutions against the criteria and the specifications, the "ideal" solution was found to be a custom polypropylene enclosure, with a removable silica desiccant tray to allow for drying of the desiccant.


Concept Model
After choosing a solution, I utilized Fusion360 to create some preliminary CAD models of how I envisioned the end product would look. Keeping in mind cost limitations, I designed the model with moldability in mind as injection molding makes the most sense for a component like this. If there is not enough market interest to offset the cost of tooling for molding then other methods of production could be assessed, but it's much easier to design something to be moldable from the get-go than it is to have to redesign a part. Additionally, if it's moldable, most other production methods can handle the part without an issue.
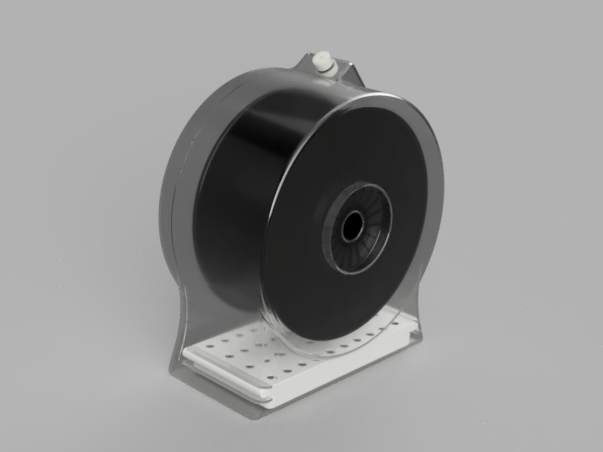

The model is missing some details, like snap fits on the mating surfaces of the two enclosure halves and sealing rings, but the overall concept is well captured. The white lidded tray in the base of the housing is the silica chamber, which slides into and out of the housing to allow the silica to be either replaced or dried and reused. The filament rests on a central post within the housing, to allow for the spool to freely spin as the extruder motor feeds the filament into the printer.